

Preparing your home to sell can feel more manageable when you break it into clear steps. A practical home staging checklist helps you decide what to clean, repair, remove, and rearrange while keeping the warmth that makes your home inviting. You don’t need to erase every personal touch. The goal is to help buyers notice the space, imagine how they might use it, and see the home clearly in listing photos.
If you’re unsure where to start, or worried that belongings and furniture are distracting from the rooms themselves, you’re not alone. A thoughtful sequence helps you focus your time and effort where they can make a visible difference. This room-by-room guide covers the entry, living spaces, kitchen, bedrooms, bathrooms, and outdoor areas, with practical steps for presenting your Northern Virginia home.
Start with the essentials, then refine the details: clear surfaces, open up pathways, address visible repairs, and make each room’s purpose easy to understand. Once your checklist is complete, you can review your home’s presentation alongside its local market context before listing.
Key Takeaways
- Walk through your home as a buyer would to spot distractions, narrow pathways, and visible maintenance needs.
- Use a home staging checklist to organize decluttering, cleaning, and a few intentional personal touches.
- Make each room’s purpose clear through furniture placement and a photo-ready focal point.
- Give outdoor spaces and the approach to your home the same tidy, considered presentation as the interior.
- Review completed, deferred, and unresolved tasks before listing photos or visits, then consider the home’s market context.
Start Your Home Staging Checklist with a Buyer’s-Eye Walkthrough
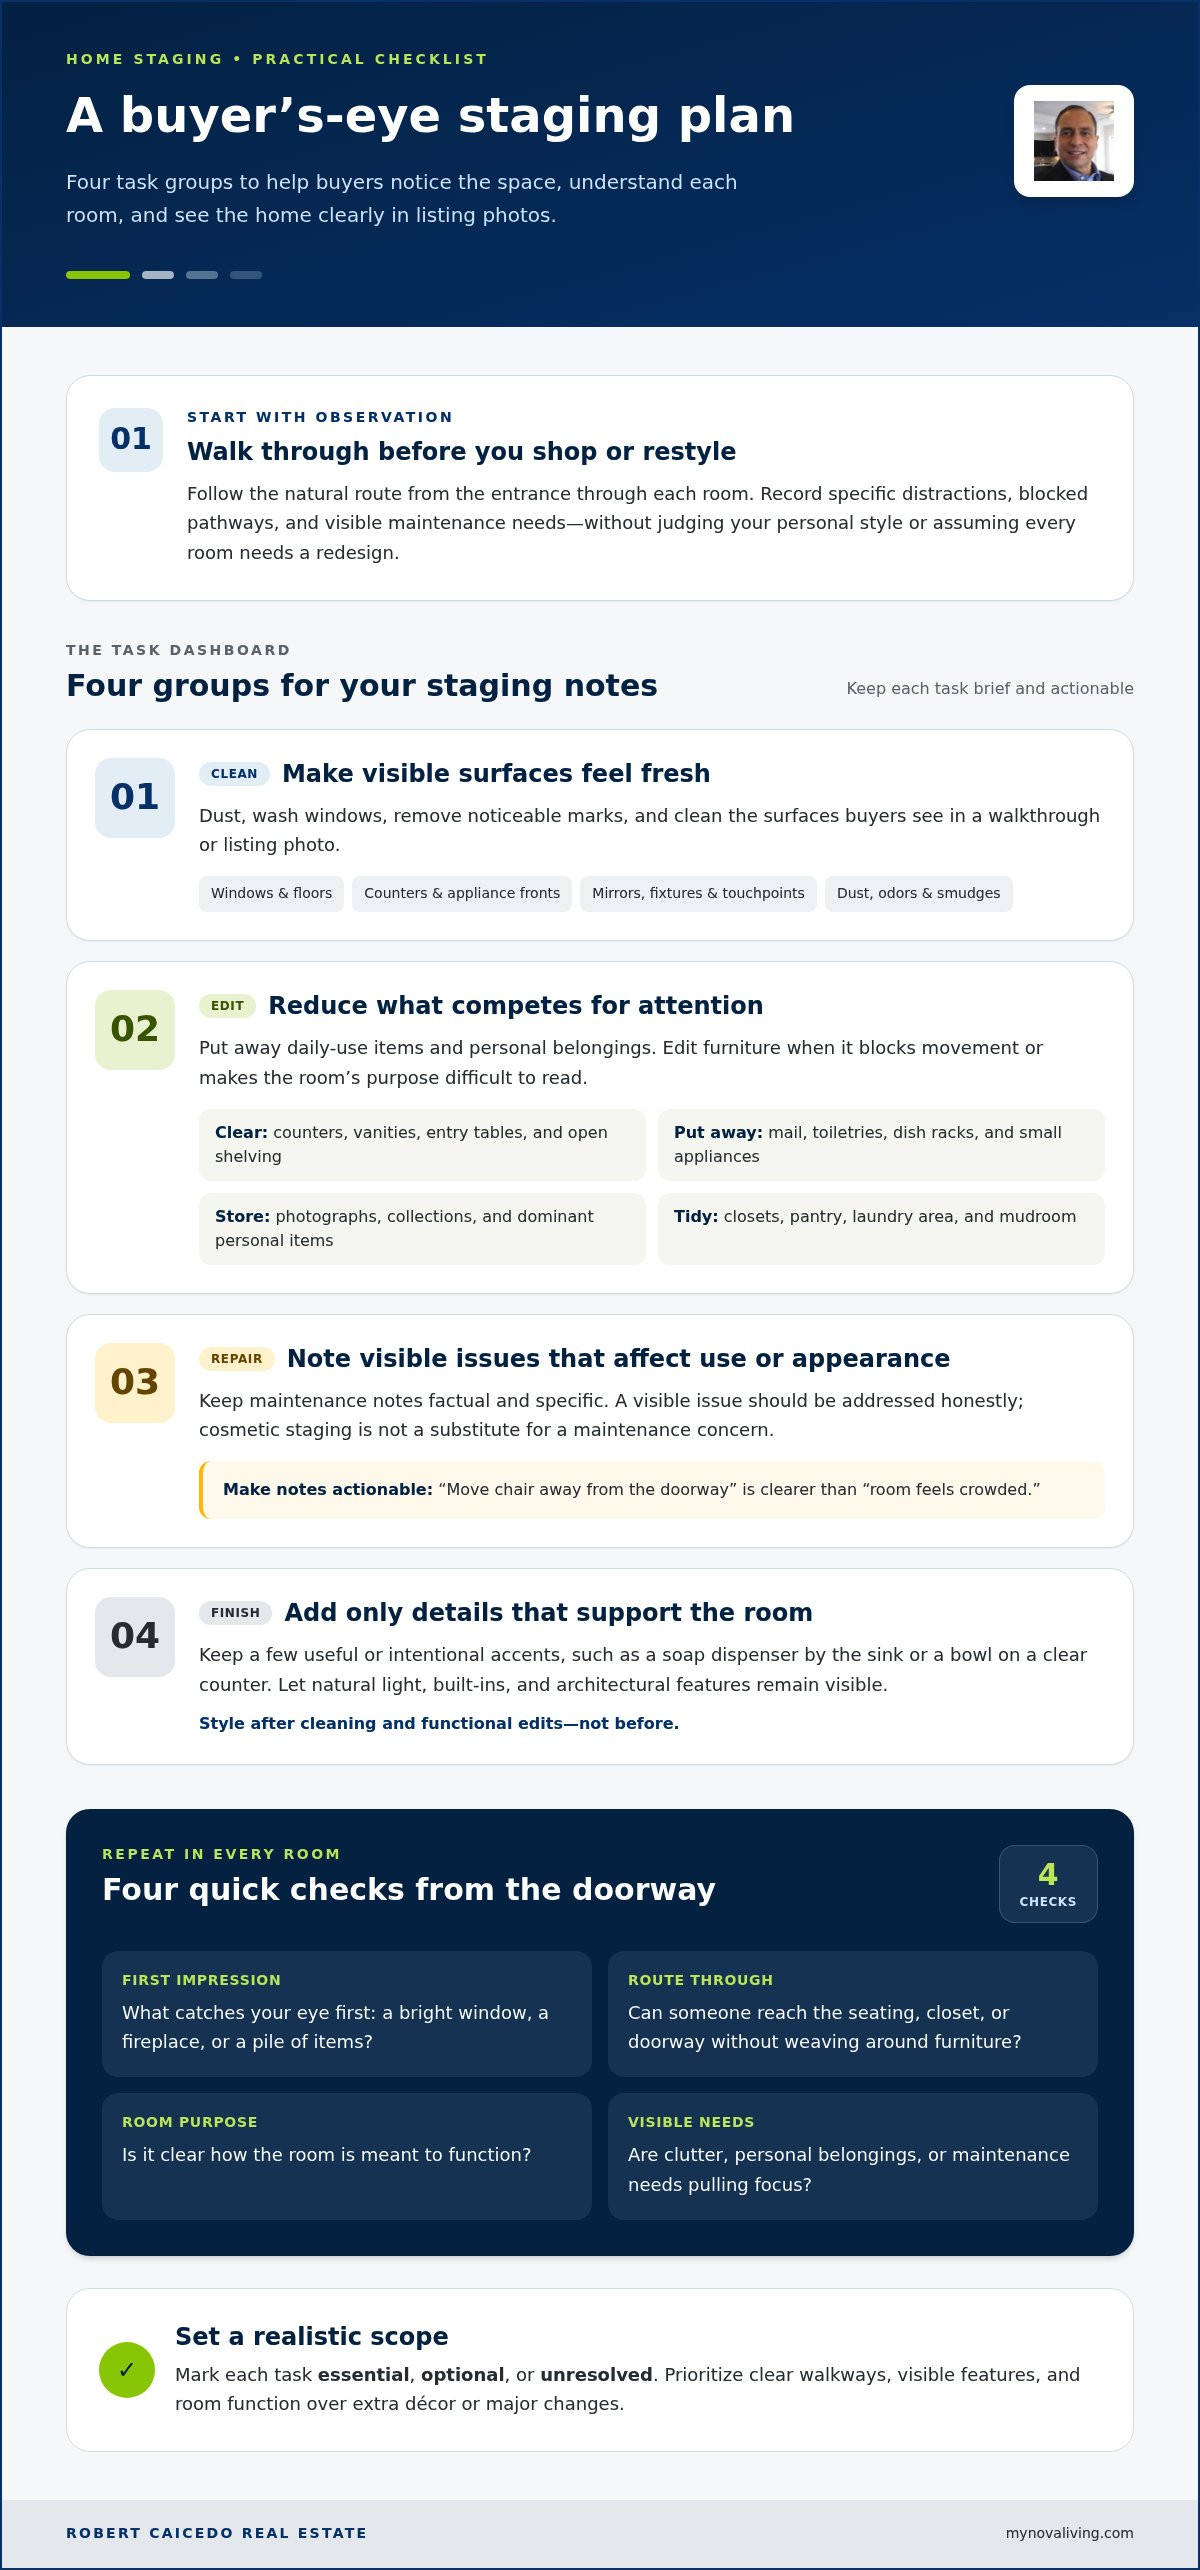
Begin with observation, not shopping. Staging is the thoughtful presentation of a home’s spaces and features, not a way to disguise its condition or promise a particular sale result. The aim is to make the layout, function, and strongest features easy to understand. For a broader overview of staging’s purpose and techniques, see What is Home Staging?
Take a slow walkthrough as if you’re seeing the property for the first time. Start at the entrance and follow the natural route through each room. Notice what catches your eye, whether you can move comfortably, and where clutter or visible maintenance needs interrupt the view. Keep this first pass factual. You’re collecting useful observations, not judging your personal style or deciding that every room needs a redesign.
Turn your observations into a short task list. Group each item so you can separate essential preparation from optional polish:
- Cleaning: Dust visible surfaces, wash windows, and remove noticeable marks.
- Editing: Reduce excess furniture, personal items, and objects that compete for attention.
- Minor repairs: Note visible issues that affect the room’s appearance or everyday function.
- Finishing touches: Identify optional updates, such as a simple accent that supports the room without crowding it.
Prioritize how the home works and what buyers are likely to notice before buying décor or considering major changes. A clear walkway or unobstructed window can do more for a room’s presentation than another accessory.
How to assess each room before staging
Pause just inside the doorway. What catches your attention first: a bright window, a fireplace, or a pile of items on a chair? Then check the route through the room. Can someone reach the seating, closet, or doorway without weaving around furniture? Note whether the room’s purpose is obvious, and record clutter, personal belongings, or maintenance needs in neutral, specific terms.
Keep notes brief and actionable. “Move chair away from the doorway” is easier to address than “room feels crowded.” Repeat the same review in each space, including hallways and transitional areas. This helps you spot recurring issues, such as furniture narrowing pathways or belongings collecting on surfaces visible from the entrance.
Set a realistic staging scope
Choose tasks that fit the home’s condition and the time you have before photography or visits. Mark each item as essential, optional, or unresolved. Then handle cleaning and functional edits before styling. This keeps your effort focused and helps you set aside changes that would take more time than they’re likely to add to the presentation.
Let the home’s distinctive details remain part of its character. If a room has attractive natural light, built-in shelving, or a notable architectural feature, arrange the space so those qualities stay visible. Accessories should support the room, not conceal its strongest features or add visual clutter.
Declutter, Depersonalize, and Clean Without Erasing Your Home’s Character
Once you’ve identified what needs attention, work through three practical steps: remove excess, clean thoroughly, and keep a few purposeful personal touches. The goal isn’t to make your home feel anonymous. It’s to help buyers notice its space, natural light, and distinctive details without competing with crowded surfaces or belongings that pull focus.
Start with the places the eye lands quickly: kitchen counters, bathroom vanities, entry tables, and open shelving. Put away daily-use items such as mail, toiletries, dish racks, and small appliances. Leave only a few useful or intentional pieces, such as a soap dispenser by the sink or a bowl on a clear counter. This creates breathing room while keeping the home welcoming.
What to remove, store, or keep
Pack away personal photographs, collections, and items that dominate a room’s visual focus. Edit furniture only when it blocks movement or makes the room’s purpose hard to read. You don’t need to remove every extra chair. Keep a small number of neutral accents that complement the room, and avoid covering distinctive features with accessories.
Edit closets and storage areas, too. Put away items you don’t need on display, then arrange what remains so it’s accessible and easy to see. An overfilled closet can make it harder to appreciate the storage. Apply the same approach to a pantry, laundry area, or mudroom: clear the floor, group everyday items, and focus on a tidy, usable space rather than an unrealistic overhaul.
A practical cleaning checklist before showings
Clean the surfaces buyers can see during a walkthrough or in listing photos. Work through windows, floors, counters, bathrooms, and often-missed touchpoints such as handles and light switches. Put away items around sinks and entry areas. Before photos or a visit, check for dust, lingering odors, and smudges that stand out in bright daylight.
- Kitchen: Clear work surfaces, wipe counters and appliance fronts, and remove dishes from the sink.
- Bathrooms: Clean mirrors, fixtures, counters, and floors; put toiletries away.
- Living areas and bedrooms: Dust visible surfaces, vacuum or clean floors, and straighten bedding.
- Entry and transitions: Clear the floor, wipe reachable surfaces, and make the route through the home feel orderly.
Keep the presentation honest. Cosmetic staging shouldn’t stand in for addressing a visible maintenance concern. If you notice a loose handle, damaged surface, or other issue, record it separately from cleaning and styling tasks so it stays on your preparation plan.
This home staging checklist is meant to guide sensible choices, not create pressure to replace everything. A complimentary home evaluation can help you consider your home and its market context alongside your staging priorities.
Stage Each Room with a Checklist for Function, Flow, and Photos
Use the same simple test in every room: can a buyer tell what the space is for, move through it comfortably, and see its most appealing features? Furniture should support the room’s use, not block a doorway, window, or focal point. Keep the overall presentation consistent, but work with the home’s actual layout rather than trying to make every space feel identical.
Use this room-by-room home staging checklist to guide your final edits. For a photo check, step back and look at the room from the doorway. Notice what the camera is likely to capture first, including anything that might be less obvious in person.
| Room | Buyer-facing purpose | Key edit | Final photo check |
|---|---|---|---|
| Entry | A welcoming, easy-to-navigate arrival | Clear shoes, bags, and items narrowing the route | Can you see the entrance and move into the home without obstruction? |
| Kitchen | A functional space for preparing and sharing meals | Clear counters while keeping fixtures and work areas visible | Do counters, sink, and the room’s main features look tidy? |
| Bathrooms | A clean, practical place for daily routines | Put away personal products and arrange towels neatly | Are the sink, mirror, and visible surfaces clear? |
| Living room | A comfortable area to sit and connect | Arrange seating to define conversation space and preserve pathways | Can the focal point be seen without furniture crowding the frame? |
| Bedrooms | A restful space for sleeping and storage | Make the bed and simplify bedside and dresser surfaces | Does the image feel calm, with windows and circulation unobstructed? |
| Flexible room | A clearly understandable secondary use | Use existing furniture to suggest a practical purpose | Does the setup match the room’s real size and features? |
Kitchen, bathrooms, and entry areas
These spaces often hold many everyday essentials, so edit with function in mind. In the kitchen, keep work surfaces and important fixtures easy to see instead of filling open space with décor. In bathrooms, put personal products away and fold or hang linens neatly. At the entry, clear shoes, bags, and anything that interrupts movement so visitors can see how to enter and move through the home.
Living rooms, bedrooms, and flexible spaces
In the living room, angle seating toward a natural focal point while leaving a clear route between the doorway and the rest of the room. Keep bedrooms restful with neatly made beds and simplified surfaces. For a flexible space, suggest a recognizable use, such as a desk in a nook, without implying the home has features it doesn’t. Before photos, check window coverings and turn on available lighting as appropriate. Look at each room both in person and through the camera view. A lamp, reflection, or crowded edge may stand out more in a photograph. Small, consistent edits help the home feel considered while letting its real layout and character lead.
Prepare Outdoor Spaces and Listing Photos for a Cohesive First Look
Your home’s first impression begins before anyone steps inside. A clear approach, tidy entrance, and orderly outdoor area help the exterior feel connected to the rooms beyond it. Use this four-step sequence to bring the presentation together, then review the photos with a fresh eye.
- Tidy the approach. Clear walkways and the entry of loose items, personal belongings, and anything that interrupts the route to the door.
- Edit outdoor items. Put away seasonal decorations, garden tools, hoses, toys, and other everyday items that draw attention away from the property. Arrange outdoor furniture simply so its use is easy to understand.
- Check transitions. Make the change from the entrance to the interior feel orderly. Look for clutter near the door and confirm that the path inside is clear.
- Review the photos. Look through exterior and interior images for visual distractions, blocked features, uneven-looking lighting, or rooms whose purpose is hard to read.
A simple exterior and entry checklist
Walk from the edge of the approach to the front door as a visitor would. Notice whether bins, shoes, packages, or outdoor furnishings compete with the entry. Keep walkways clear and arrange chairs or a small table without blocking paths or views. The goal isn’t to conceal everyday life or suggest features the property doesn’t have. It’s to make the existing entrance and outdoor spaces easy to see and use.
Check the transition inside, too. A clean doorway and uncluttered route create a natural visual handoff from exterior to interior. Keep the entry’s presentation consistent with the rest of the home, rather than adding decorations that feel disconnected from its character.
Make each room ready for listing photos
Before photographs, put away temporary clutter and straighten visible furnishings. Then review the images themselves, not just the rooms in person. A chair that seems harmless may block a window in the frame; a countertop item may become the image’s focal point. Check that each room remains recognizable and that its actual layout and features are represented accurately.
Use a short photo review: look for clutter near the edges of each frame, obstructed windows or architectural details, distracting reflections, and rooms that appear dim or visually inconsistent with neighboring spaces. If an image makes a room’s function unclear, consider whether a small furniture adjustment or tidier surface would help before reshooting. Avoid edits that imply extra space, amenities, or features the home doesn’t have.
A complete home staging checklist carries the same care from the front walk to the final image. To connect your home’s presentation with its selling strategy, explore seller representation with MyNovaLiving.
Finish Your Home Staging Checklist with a Seller-Ready Review
Before photography or buyer visits, return to the notes from your first walkthrough. Mark each item completed, deferred, or unresolved. This gives you a clear view of what’s ready, what still needs attention, and what you’ve chosen not to tackle. A finished home staging checklist isn’t about making every space perfect. It’s about confirming that the home feels clean, functional, and accurately presented.
Look at the home as a whole, not just as a series of separate tasks. A tidy living room can still feel disconnected if the route from the front door is cluttered. A cleared counter may not be enough if a visible maintenance issue remains unresolved. Use the final review to catch these gaps and decide what to address before the home is photographed or shown.
A final walkthrough before photos or buyer visits
Start at the front door and follow the route a visitor would take. Check entryways, visible surfaces, lighting, room purpose, and clear circulation from one area to the next. Put away everyday items that could distract in photographs or during a visit, such as mail, toiletries, bags, and countertop appliances. Confirm that furnishings and accessories show the home’s actual condition and features without suggesting anything it doesn’t offer.
For a quick final check, ask yourself:
- Can visitors enter and move through each room comfortably?
- Are the main features visible, rather than hidden by belongings or furniture?
- Does each room’s use make sense at a glance?
- Are there deferred or unresolved items that need a decision before photography or visits?
If something remains unresolved, decide whether to address it now, record it for follow-up, or leave it as is. A deliberate decision helps keep the issue from getting lost in the shuffle.
Connect presentation decisions to your selling plan
Staging priorities vary with a home’s layout, condition, and local market context. There isn’t one formula that fits every property. Keep choices focused on clarity and on the strengths the home already has, rather than adding changes simply because they’re popular elsewhere.
Robert Caicedo Real Estate provides complimentary home evaluations and market reports for sellers. These resources can help you consider your home’s presentation alongside its local market context as you plan next steps. A clear preparation plan keeps attention on what buyers can see and understand, without promising a particular sale result.
To discuss your selling plans, contact Robert Caicedo Real Estate at 703‑220‑7032.
Take the Next Step Toward a Confident Listing
Your home staging checklist gives you a starting point, but your next move can reflect your timing, priorities, and selling plans. Focus on choices that make the home easy to understand and true to its character. You don’t need to solve every detail at once. A clear plan can help you move forward with confidence.
As you prepare, consider how each decision fits the local market. MyNovaLiving offers comprehensive real-estate services for buying and selling homes, helping you connect preparation with the wider decisions involved in a move. Sellers can also use complimentary home evaluations and market reports to consider their home in its market context.
When you’re ready to discuss - whether a simple question or a serious inquiry - don’t hesitate to request more information or call 703‑220‑7032. Your next chapter can begin with a thoughtful plan and a home presented with care.
Frequently Asked Questions
Is home staging necessary before listing a home?
Home staging is a presentation choice, not a guaranteed requirement or a promise of a particular result. You can begin with practical steps, such as moving a bulky chair that hides a room’s size, cleaning windows, or making a dining area’s use clear. Choose tasks that suit the home’s condition and your timeline. Not every property needs rented furnishings, new décor, or a full redesign.
Can I stage my home while I’m still living in it?
Yes. Create a simple reset routine that fits your household: keep daily essentials in one easy-to-reach place, then put them away before photos or visits. For example, use a basket for mail and chargers so the kitchen counter can be cleared quickly. Keep rooms comfortable for daily life, and return items to their usual places afterward. The goal is a truthful, livable presentation, not a home that feels unused.
How should I stage a vacant home?
Start with a careful walkthrough and cleaning, then consider whether each room’s purpose is understandable without furnishings. A dining area may read clearly from its location and proportions, while an empty bonus room could feel ambiguous. If you choose to add a few furnishings, keep them in scale with the space and consistent with its actual features. Vacant homes don’t automatically require professional staging, and no presentation choice guarantees buyer interest.
What rooms should I prioritize when staging a home?
Prioritize spaces that shape a visitor’s first impression or explain how the home works. Your home staging checklist might begin with the entry, then cover the kitchen, bathrooms, living areas, and bedrooms. Adjust the order to suit the property: a narrow entry that feels crowded may deserve attention before a less visible bedroom. For sellers in Aldie, Leesburg, Middleburg, Ashburn, Sterling, Reston, and Washington, D.C., the home’s condition and layout should guide the plan.
Should I remove family photos before listing photos are taken?
Consider putting away photos that dominate a wall or draw attention away from a room’s size and features. You don’t need to erase every personal detail; a home can still feel lived in and welcoming. Review each room from the doorway and look at the photo frame for strong visual distractions. Store family pictures and other personal belongings safely during preparation so they’re protected and easy to restore later.
How do I keep staging from feeling too impersonal?
Keep the presentation simple, but let the home retain its character. A few well-chosen accents, such as a bowl on a dining table or a plant near a bright window, can add warmth without crowding the room. Keep distinctive details visible and show how the space is genuinely used. The aim is to help visitors understand the home, not make every property look identical or conceal what makes yours distinct.


